The unified UI has divided configurations under two different segments wherein all the Service Virtualization level configurations are present in the left panel via the ![]() icon. Once user have logged into the product UI, they need to click on the above mentioned icon to access the Configuration module. Once clicked, they will be redirected to the following screen:
icon. Once user have logged into the product UI, they need to click on the above mentioned icon to access the Configuration module. Once clicked, they will be redirected to the following screen:

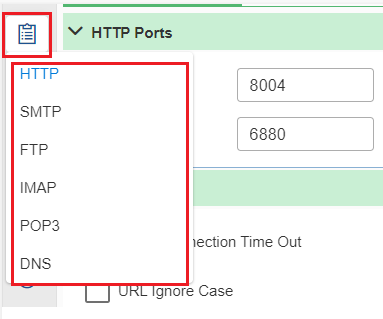
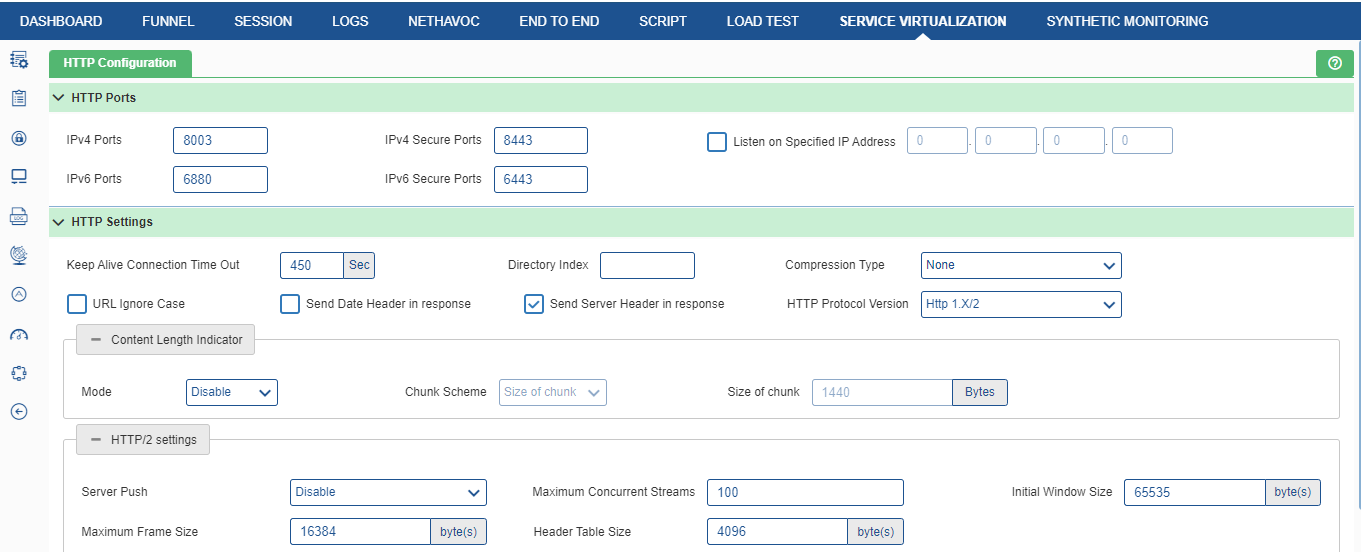
Users will be directed to the HTTP Configuration, which is part of the Protocol Settings, as the landing page for configurations. Let us now understand the various protocols supported by Service Virtualization and their details.
Here is the illustration of the icons at the left along with its name.
Icon | Setting |
Static Resource | |
Protocol Settings | |
SSL Configuration | |
Service Time Settings | |
Logging | |
Internet Simulation | |
Advance Settings | |
JMS Settings | |
Connection Fault Settings |
Static Resources
The static resource configuration option gives the ability to add hosts and provide the relevant configurations against these hosts. To access this configuration module, click on the icon. Host configuration privileges control the ability to configure hosts. Click the Static Resources ![]() icon, the following window is displayed:
icon, the following window is displayed:
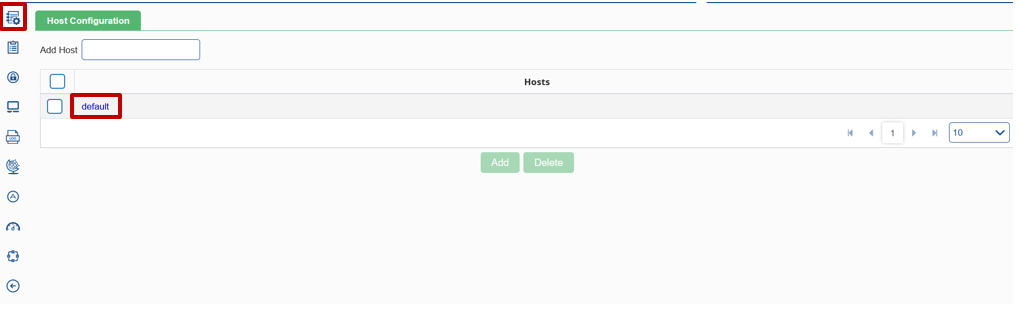
To add a host, enter the host name under the Add Host field and click on Add button to add the host. Once added, user will able to see the corresponding entry in the Hosts table. To configure the static URLs against an added host, click on the host name (as highlighted in the image above).
Once clicked, user will be redirected to the following screen where they can click on the ![]() button to add html, icon, and other files according to their requirement. After adding all the necessary files under a host, user can edit the settings of a particular URL by clicking on the required item as shown below:
button to add html, icon, and other files according to their requirement. After adding all the necessary files under a host, user can edit the settings of a particular URL by clicking on the required item as shown below:

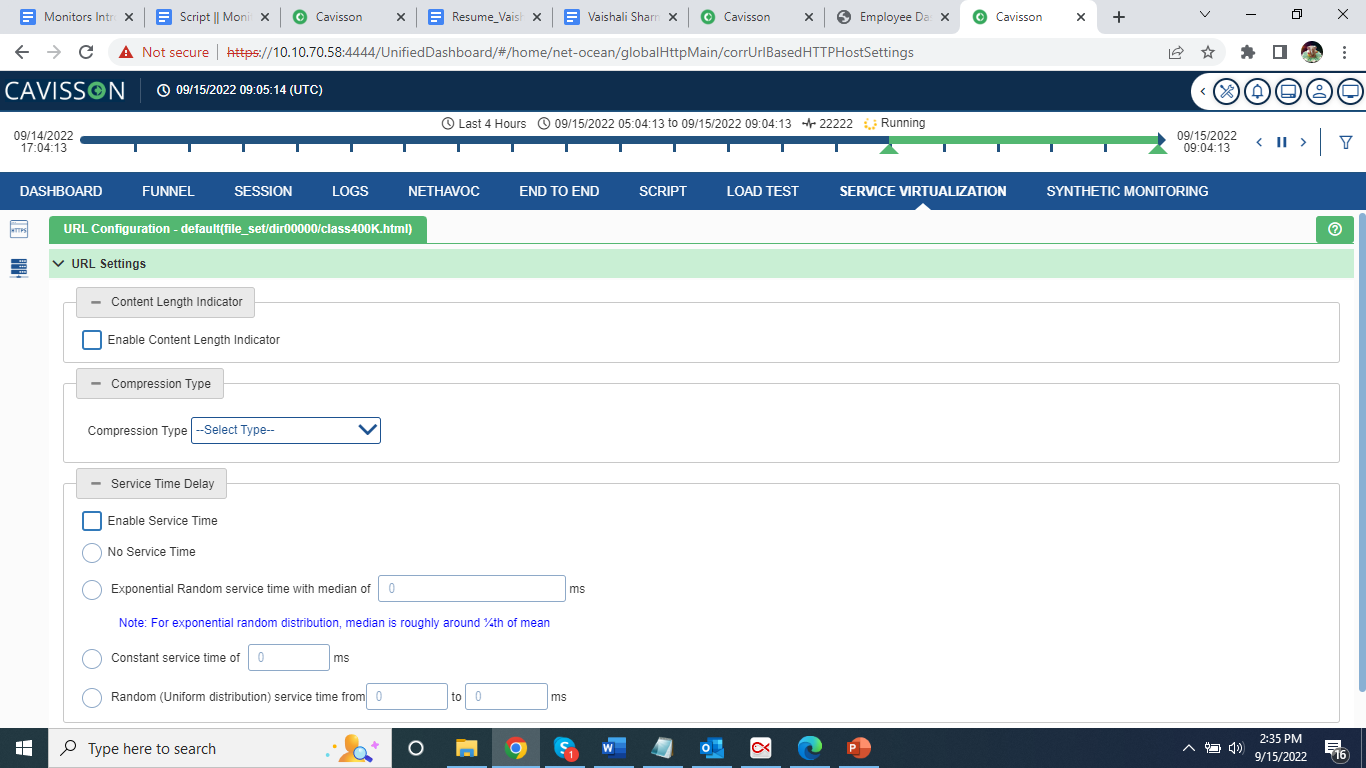
Let us see what all the options/fields signify:
- Compression Type: This keyword is to enable the different types of ‘Content-Encoding’ header in http response like gzip, deflate,br. The response will also be compressed.
- Content Length Indicator: It has the following options:
- Mode: Specifies whether the feature should be Enabled or Disabled.
- Chunk Scheme:
- Size of Chunk: Specifies the size of individual chunk.
- Number of Chunk: It defines the number of chunks in which the response should be served.
- HTTP Service Time: This Keyword is to set Service time delay for static URL.
- No Service Time: No service time is used.
- Exponential Random service time with median: For exponential Random distribution median is roughly around 1/4th of mean.
- Constant service time: Serves a constant delay in the response.
- Random (Uniform distribution) service time: It is used for uniform distributed service time.
Click the ‘server push settings’ and URL configurations window is displayed.
Server Push Settings
Another option available to users is the Server Push Settings ![]() which can be accessed by clicking the icon. Once clicked, the following window is shown:
which can be accessed by clicking the icon. Once clicked, the following window is shown:

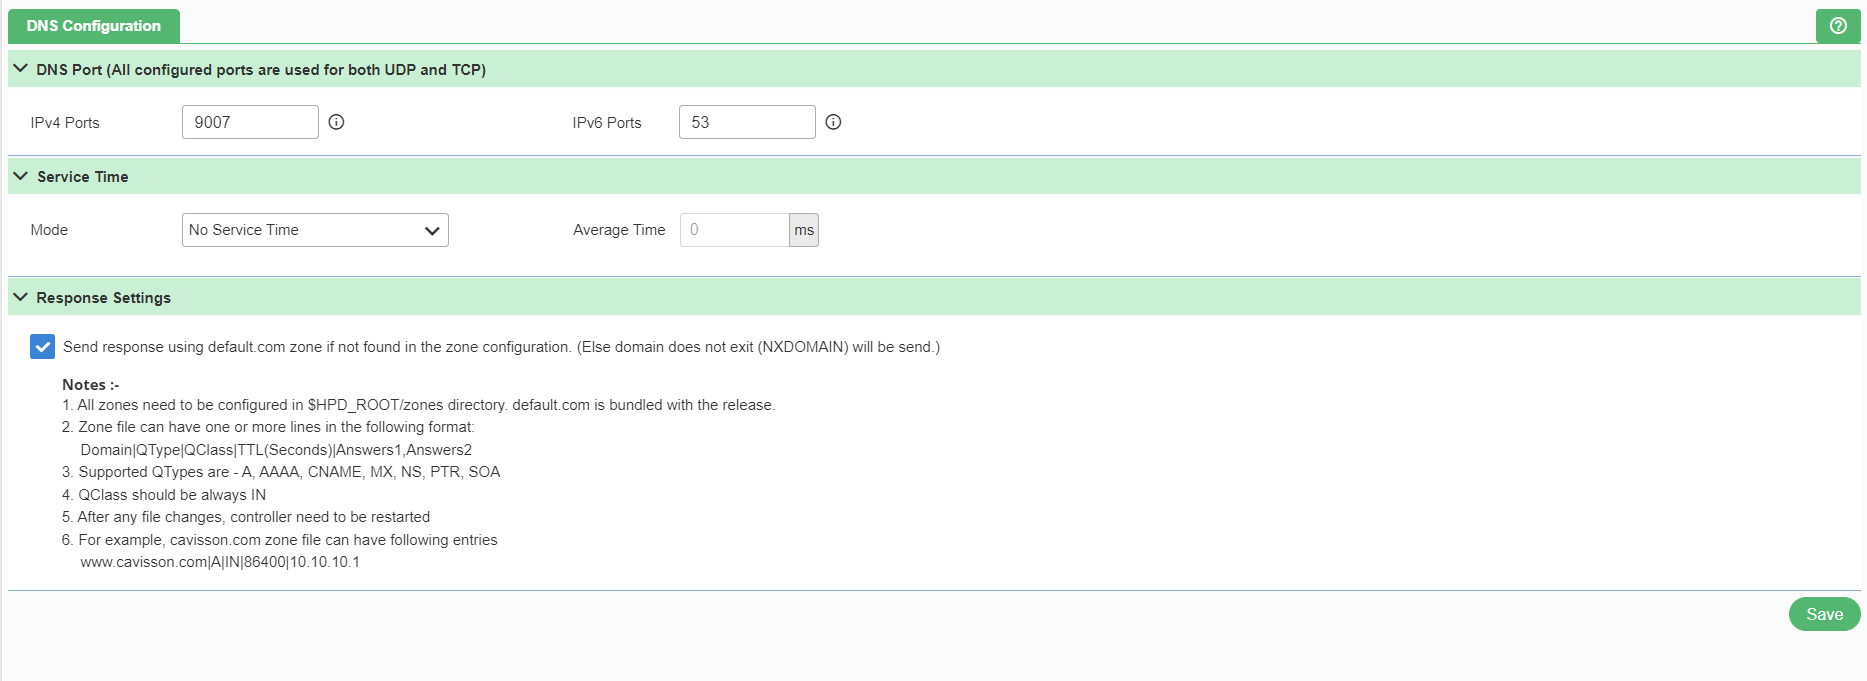
DNS Port
- IPv4 Ports:DNS port for IP version 4.
- IPv6 Ports:DNS port for IP version 6.
Service Time
- Mode
- No Service Time: No service time delay is applied. Helps in doing max load testing.
- Exponential Random:Exponential random service time with median of specified milliseconds is applied. For exponential random distribution, median is roughly around 1/4th of the mean. This takes a random value equivalent to median time.
- Constant:A constant service time of specified milliseconds. Helps in doing controlled tests.
- Uniform Distribution:It is more Realistic. The value is a random value between the minimum and maximum time defined. Min should be less than or equal to Max.
Response Settings
Send response using default.com zone if not found in the zone configuration. (Else domain does not exit (NXDOMAIN) will be sent.
Notes:
- All zones need to be configured in $HPD_ROOT/zones directory. default.com is bundled with the release.
- Zone file can have one or more lines in the following format:
Domain|QType|QClass|TTL(Seconds)|Answers1, Answers2
- Supported QTypes are – A, AAAA, CNAME, MX, NS, PTR, SOA
- QClass should be always IN
- After any file changes, controller need to be restarted
- For example, cavisson.com zone file can have following entries
www.cavisson.com|A|IN|86400|10.10.10.1
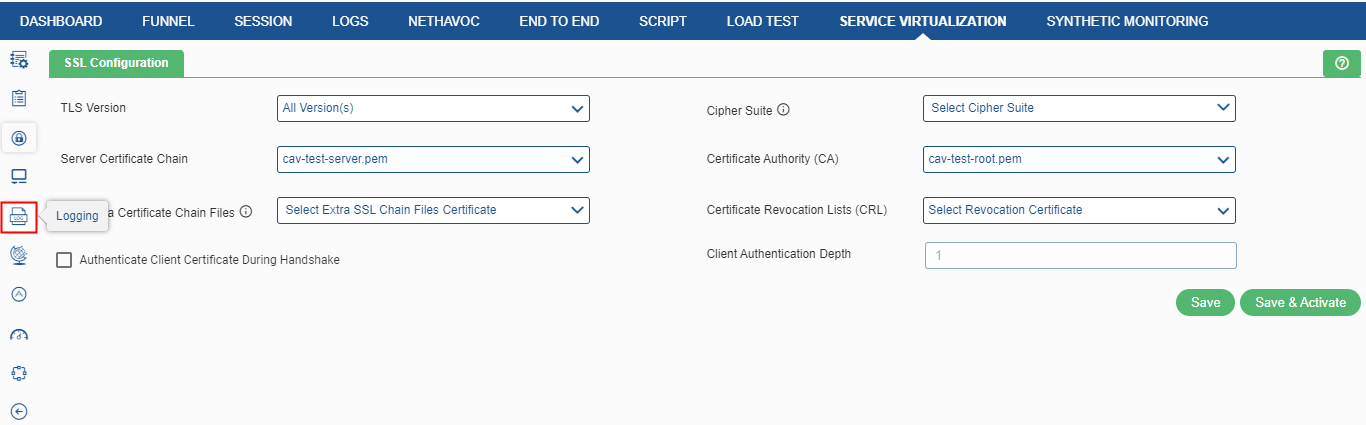
SSL Configuration
The Secure Socket Layer (SSL) configuration contains the attributes that user need to control the behavior of client and server SSL endpoints. There are two options within this menu – SSL Configuration and SSL Management. To access SSL configuration click the SSL Configuration menu item![]() and select SSL Configuration in the drop down to access the module as shown in figure below.
and select SSL Configuration in the drop down to access the module as shown in figure below.
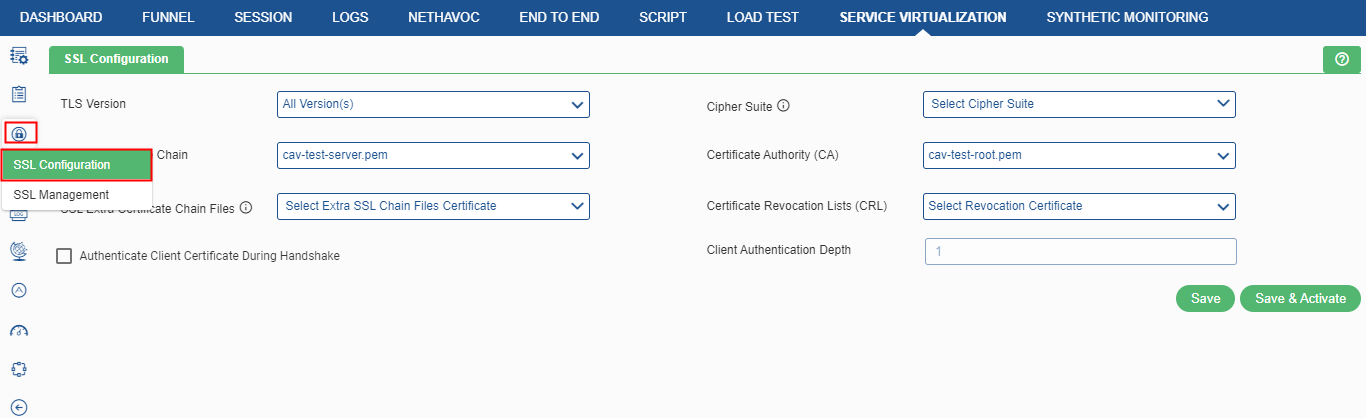
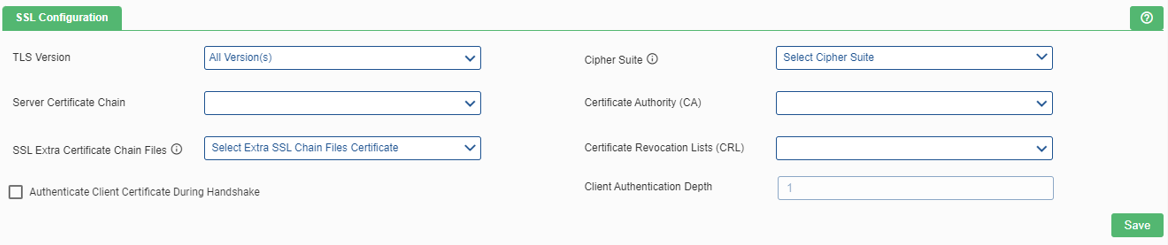
Specify the following fields:
- Client Authentication during handshake: This enables the client authentication during the handshake process between the client and the server.
- TLS Version: It provides communication security over a computer network to have privacy and data integrity between two or more communicating computer applications. The available options are – SSL V3, TLS 1.0, TLS 1.1, TLS 1.2, TLS 1.3, and all versions.
- Cipher Suite: It contains a set of algorithms that help to secure a network connection. It typically uses Transport Layer Security (TLS). If the cipher suite is not selected, the default cipher suite will be considered according to the selected TLS version.
- Server Certificate Chain: User need to provide the server certificate path. The path where the server certificate is installed.
- Certificate Authority (CA): A CA issues digital certificatesthat contain a public key and the identity of the owner. Here, user need to provide the CA path.
- Certificate Revocation Lists (CRL): A certificate revocation list (CRL) is a list of certificates (or more specifically, a list of serial numbers for certificates) that have been revoked or are no longer valid, and therefore should not be relied upon.
- Client Authentication Depth: Depth value is a number which specifies how deeply to verify the certificate issuer chain before deciding the certificate is not valid.
- SSL Extra Certificate Chain Files This option is used to add an extra SSL Chain file certificate. The user has to enter the file name in .der This saves the certificates with specified settings.
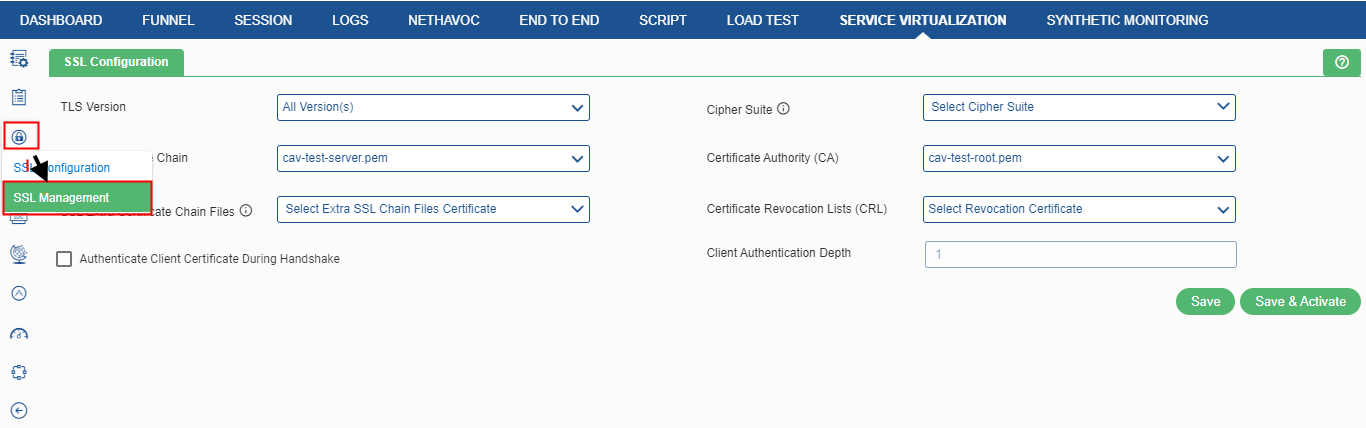
SSL Management
SSL Management is the process of monitoring and managing the lifecycles from acquisition and deployment to tracking renewal, usage and expiration of all the SSL certificate which are deployed within the network. This section is used to view the Service Virtualization SSL management that contains details of SSL certificates and certificate revocation list. To access SSL configuration, click the SSL Management menu item![]() and select SSL Management in the drop down to access the module as shown in figure below.
and select SSL Management in the drop down to access the module as shown in figure below.

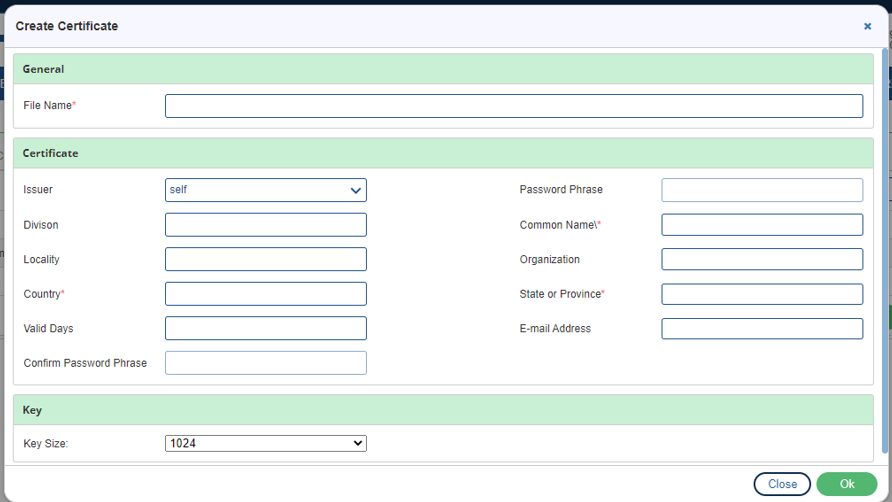
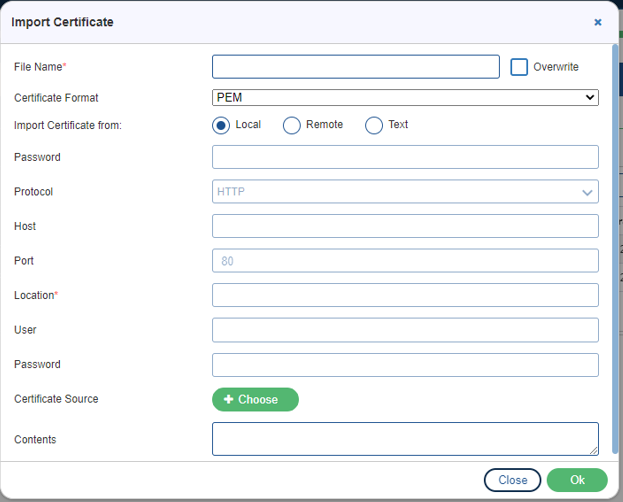
User can also import a certificate by clicking the Import button on the Certificate window. A window is displayed where they need to provide details on the file to import.
Click on the Import ![]() button. The Import Certificate window is displayed where the user needs to provide the following details:
button. The Import Certificate window is displayed where the user needs to provide the following details:
- File Name: The name of the file which is being imported.
- Certificate Format: The type of certificate format to be imported. There are three format – PEM, DER, PFX.
- Import Certificate from: The location from where the file is to be imported. There are three ways – Local, Remote, Text.
Note: If a user selects Remote, then they have to select the protocol type in which they want to import the certificate.
- Password: The password which is to be given by the user.
- Protocol: The type of protocol to be used i.e. HTTP, HTTPS, FTP, TFTP, SCP.
- Host: It defines the hostname.
- Port: It defines the port. By default, the port is 80.
- Location: The location from where the certificate is to be imported. It is a mandatory field.
- User: It defines the user name to be used.
- Password: It defines the password against the user name to be used.
- Certificate Source: The source for the certificate. User can click on the Choose
 button if they want to add the source from their local.
 - Contents: It defines the content of the file which is to be sent.

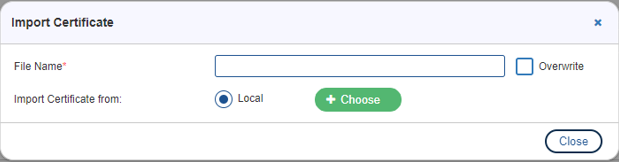
Click ![]() button to select the path and select that file wanted to import.
button to select the path and select that file wanted to import.

Now enter the File Name then click on import icon ![]() .
.
If user want to export the file, first select from the check box then click on Export.
By clicking Delete button, user can simply delete the selected certificate file.
Service Time Settings
Service Virtualization sends response of the service as soon as the request is received. So, there is no delay in the response. Users can add service time delay by using Service Time Delay settings which can be accessed within the configurations menu by clicking on the following icon: ![]() as shown in the figure below.
as shown in the figure below.
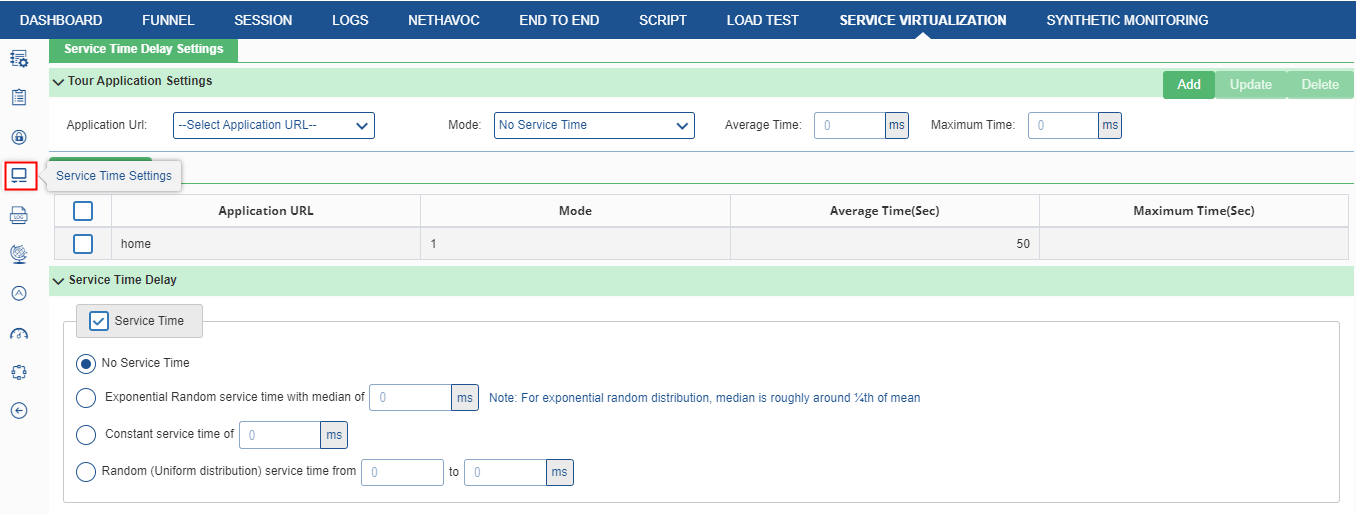
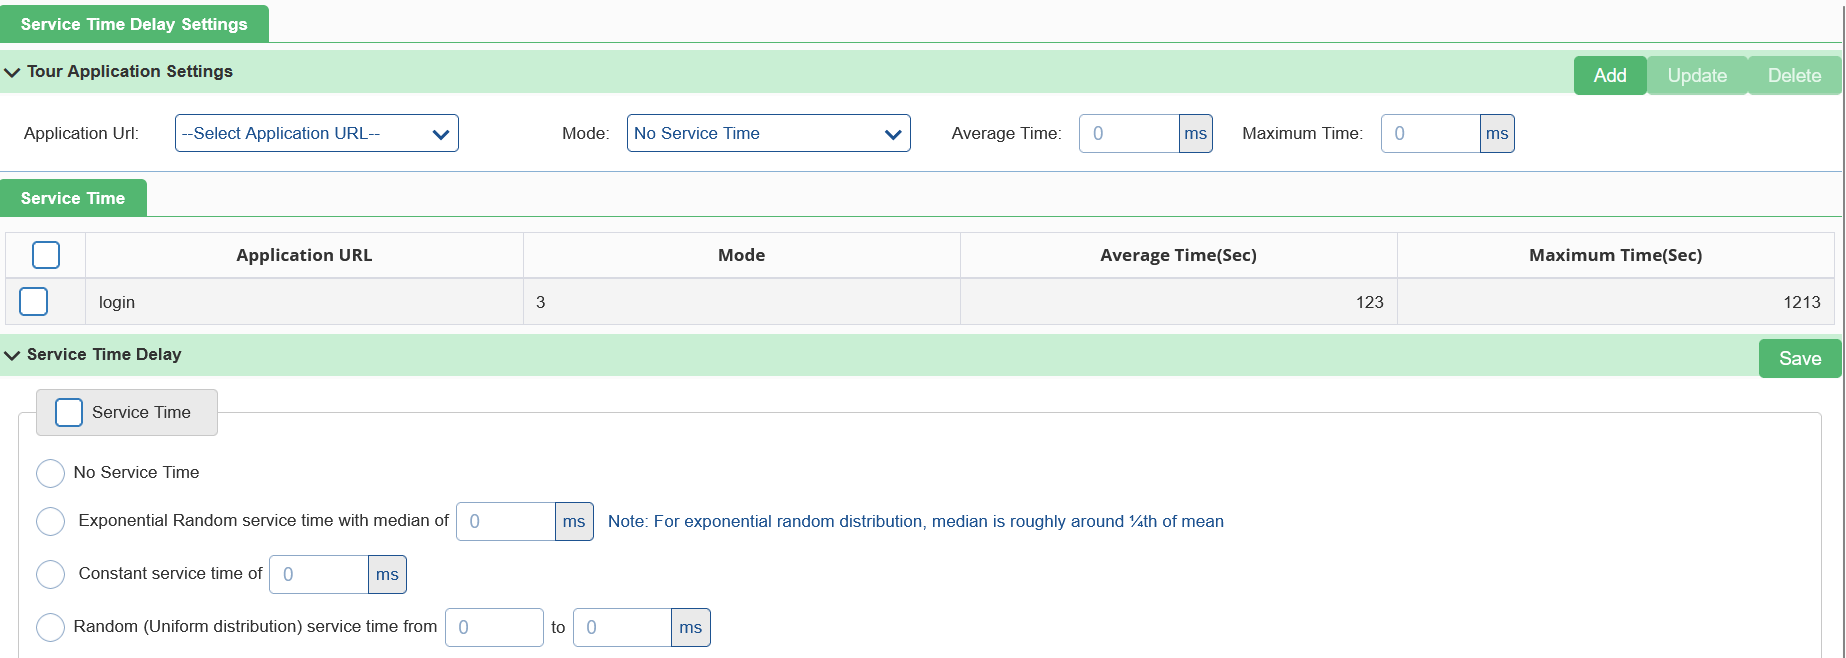
Specify the following fields:
Tour Application Settings
- Application URL: Select the application URL from the drop-down list.
- Mode: To apply service time for Static URLs.
- No Service Time: No service time delay is applied. Helps in doing max load testing.
- Exponential Random: Exponential random service time with median of specified seconds is applied.
- Constant: A constant service time of specified seconds. Helps in doing controlled tests.
- Uniform Distribution: It is more Realistic. The value is a random value between the minimum and maximum time defined. Min should be less than or equal to Max.
- Average Time: The Time taken in between Min and Max time (Formula: (Min+Max)/2) or (no of transactions * time of each transaction/total no of transactions).
- Maximum Time: Time taken for completing the Service test.
Click on Add to see the applied settings in the Service Time table below the configuration option.
Service Time Delay
There are following fields in Service Time delay.
- Enable Service Time: Select this check box to enable service time and proceed further.
- No service time: No service time used.
- Exponential Random service time: For exponential random distribution, median is roughly around ¼th of mean.
- Constant service time: This property is used to provide constant service time.
- Random (Uniform distribution) service time: This property is used for uniform distributions service time.
Logging
To access Logging click the Logging ![]() menu item as shown in figure below.
menu item as shown in figure below.
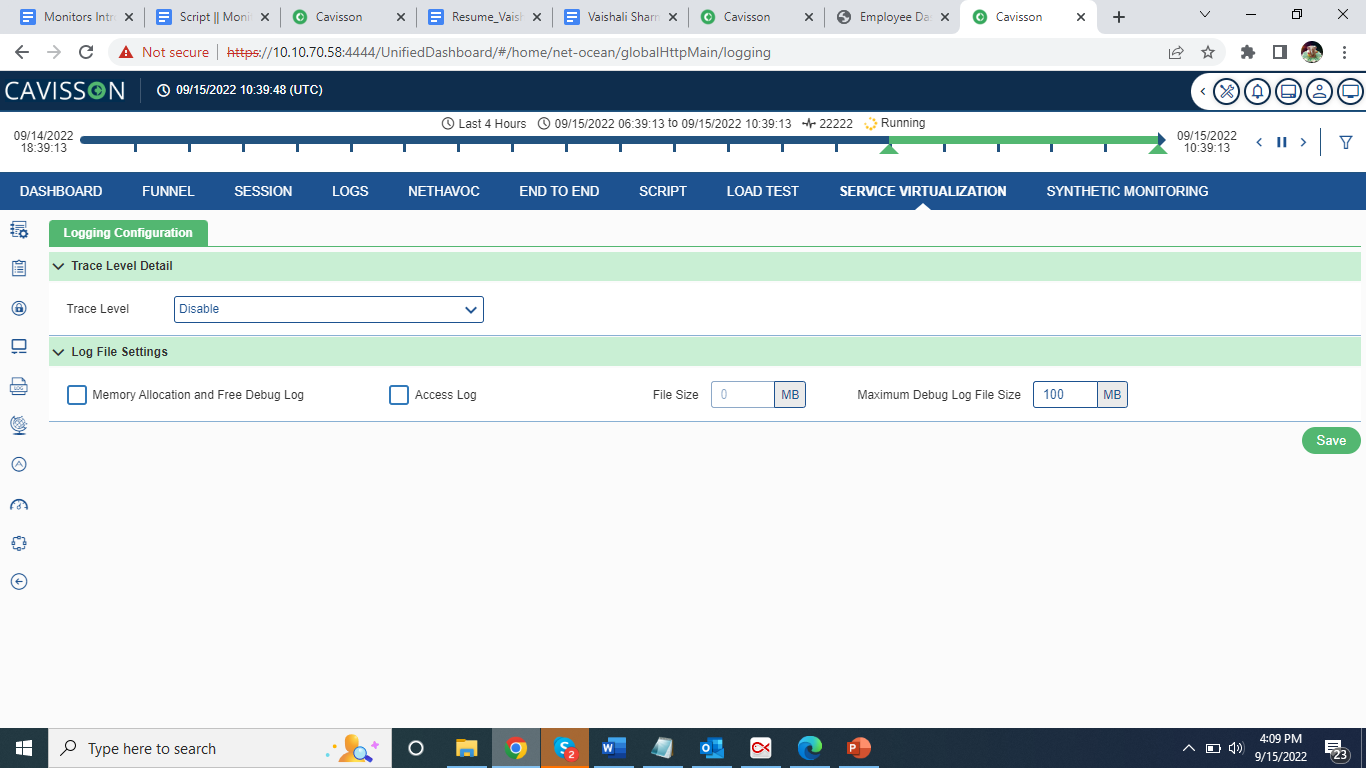
Specify the following fields:
- Trace Level:
- Disabled: No logs.
- Level 1: Request arrival time, URL, client IP, port, request file, service time, template name, response file, response time.
- Level 2: Level 1 + parameters names and their values applied to that service.
- Memory allocation and free debug log: To enable the memory Allocation and debug logs.
- Maximum Debug Log File Size: User can provide the maximum size of Service Virtualization Server_debug.log file. Debug Log File size is in MB.
- Access log: Request stats using access Log such as Requests/Sec, Service Time, Receive Throughtput.
Internet Simulation
To access Internet Simulation ![]() click the icon as shown in figure below.
click the icon as shown in figure below.
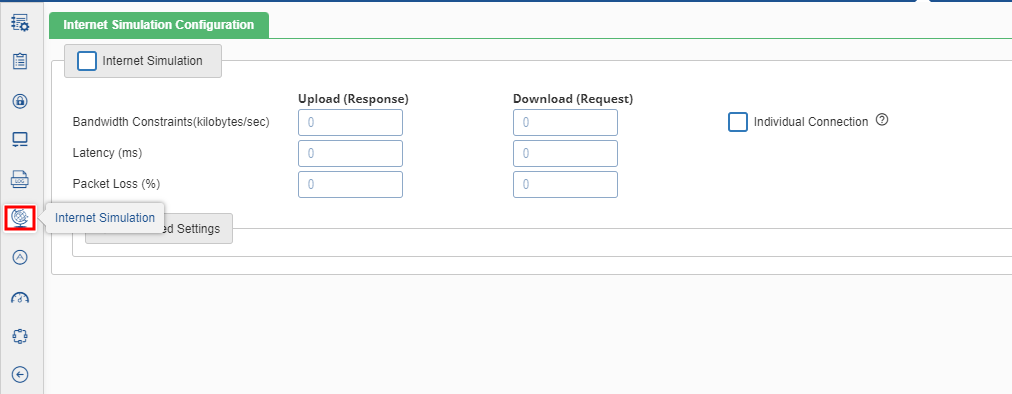
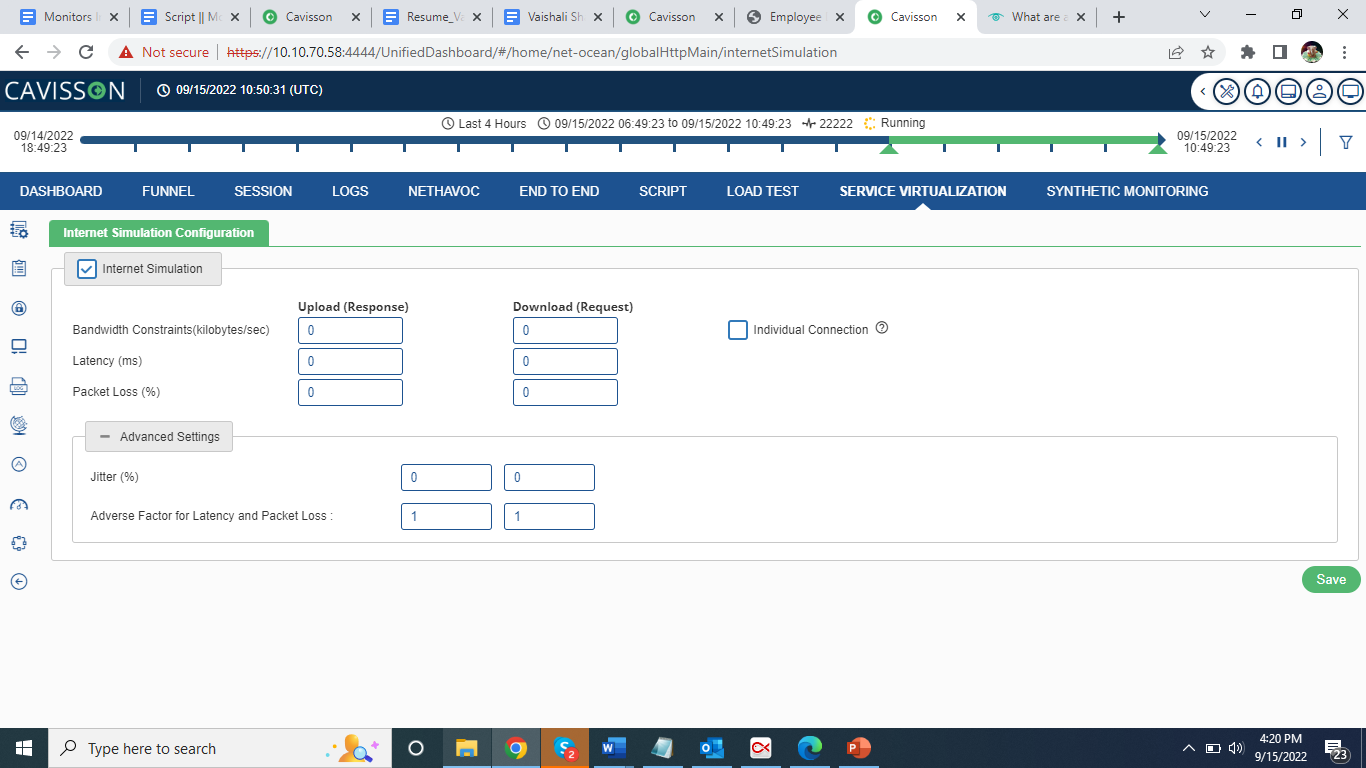
Specify the following fields:
- Enable Internet Simulation: This is used to activate the WAN simulation. To enable internet simulation, select the Internet Simulation check box.
- Individual Connection
- User checked the individual connection then bandwidth constraints for individual connection.
- User unchecked the individual connection then bandwidth constraints for overall connection.
- Bandwidth Constraints(kilobits/sec)
- Upload: It is the bandwidth limitation from NO to NS (server to client).
- Download: It is the bandwidth limitation from NS to NO (client to server).
- Latency (mili-secs)
- Upload: It is the time interval between the stimulation and response from NO to NS.
- Download: It is the time interval between the stimulation and response from NS to NO.
- Packet Loss (%)
- Upload: It is the percentage of packets lost while data travelling from NO to NS.
- Download: It is the percentage of packets lost while data travelling from NS to NO.
Advanced Settings
- Adverse factor for latency and packet loss: It is the variable percentage for latency and packet loss from NO to NS and vice versa.
- Jitter (%)
- Forward: It is any deviation in, or displacement of, the signal pulses in a high-frequency digital signal from NO to NS (server to client).
- Backward: It is any deviation in, or displacement of, the signal pulses in a high-frequency digital signal from NS to NO (client to server).
Advance Settings
Click the Advance Settings![]() icon under the Configuration section as shown in below figure.
icon under the Configuration section as shown in below figure.
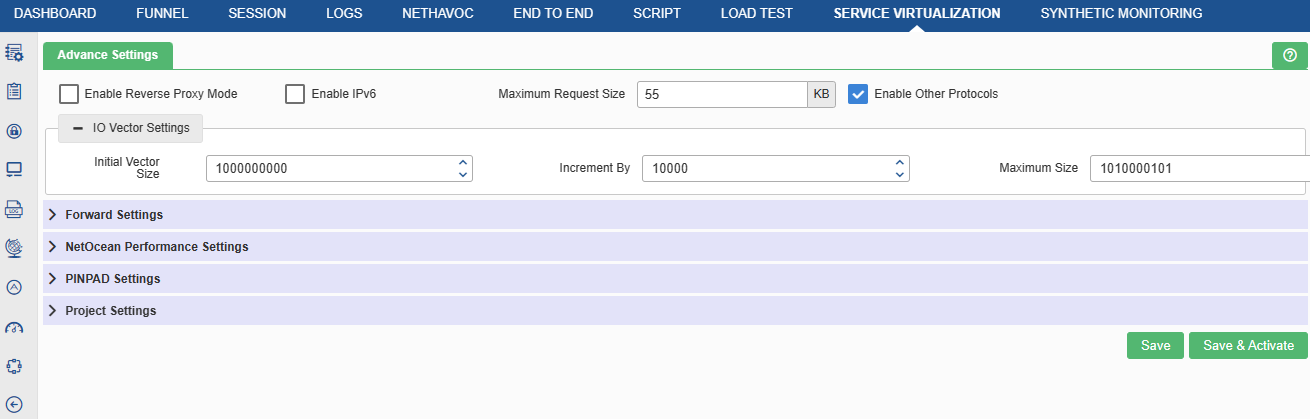

PINPAD Settings
PinPad services are used to serve the requests of PinPad devices. A PIN pad or PIN entry device is an electronic device used in a debit, credit, or smart card-based transaction to accept and encrypt the cardholder’s personal identification number (PIN), for example – an ATM machine.
- Pinpad Trace: To apply the pinpad settings, user first needs to enable this keyword.
- Pinpad Ports: Specify the port of the pinpad services.
- Keys: Specify the value of the key here.
Project Settings
- Project Directory: Used to create/choose different correlation directory. It helps in segregation of services.
JMS Settings
Java Message Service (JMS) is an application program interface (API) that supports the formal communication known as messaging between computers in a network. Here the Service Virtualization act as consumer and consume the information from JMS server and forward it to other server if needed.
This section is used to add JMS configuration and manage JMS configuration. The description is provided in the subsequent sections. Click the JMS icon ![]() under the Configuration section as shown in below figure.
under the Configuration section as shown in below figure.
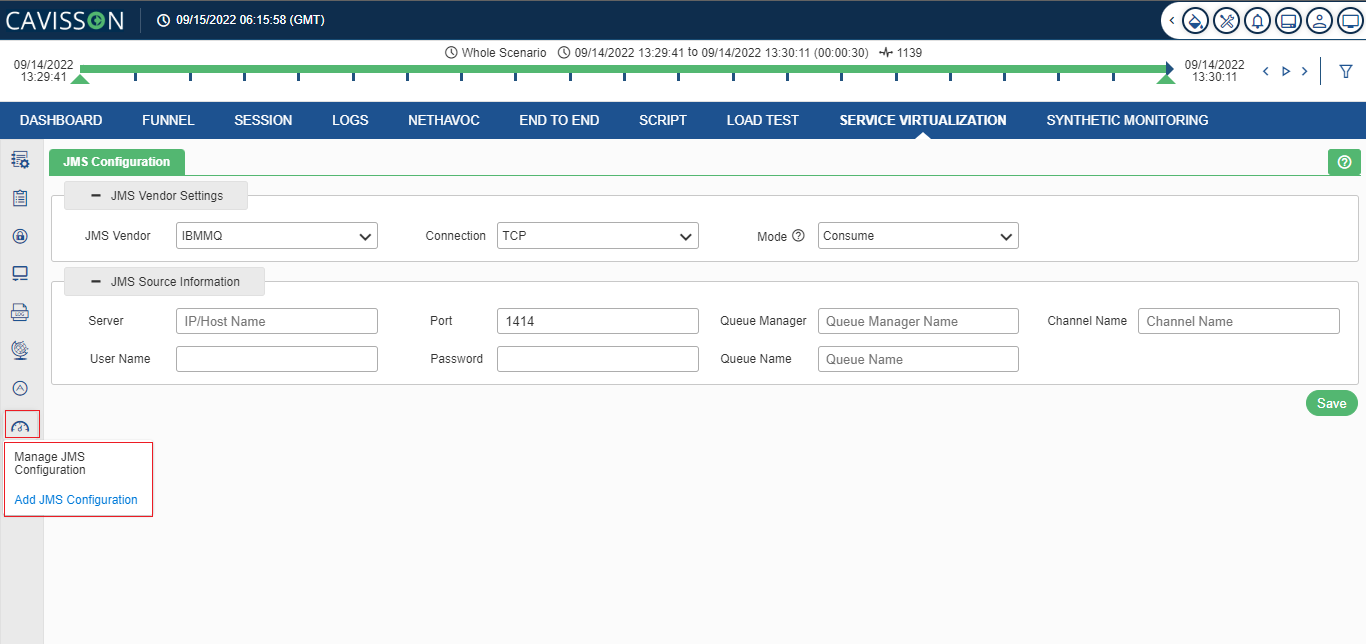
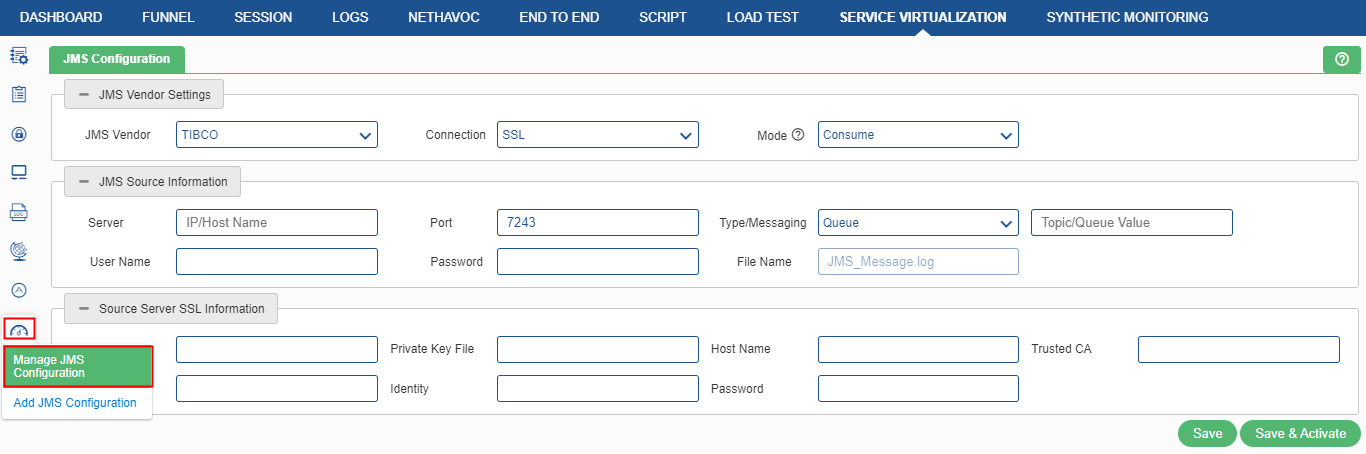
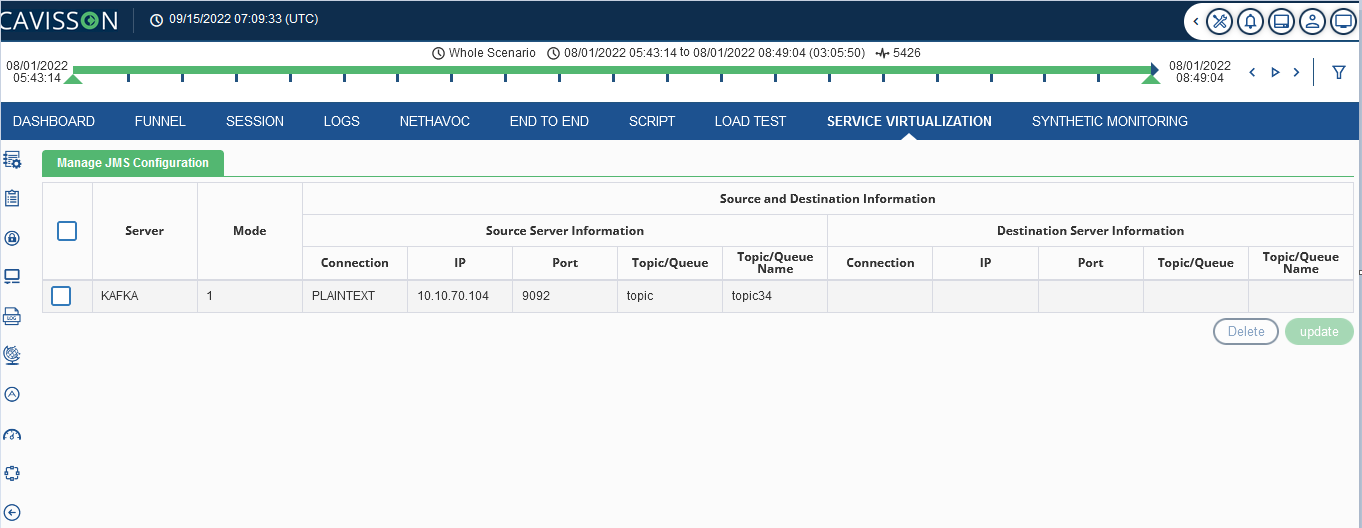
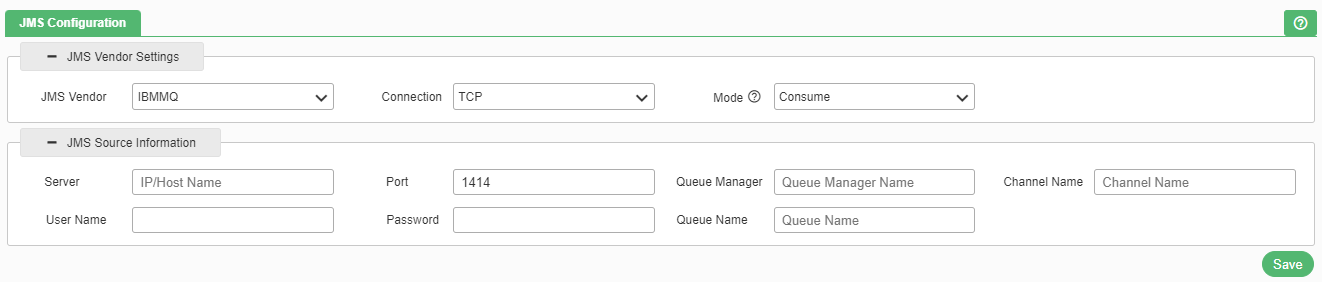
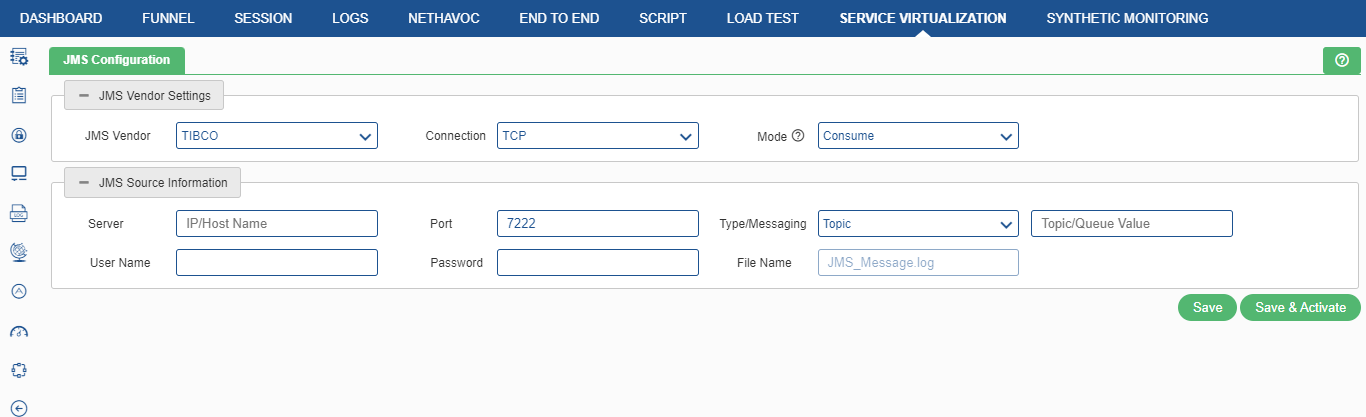
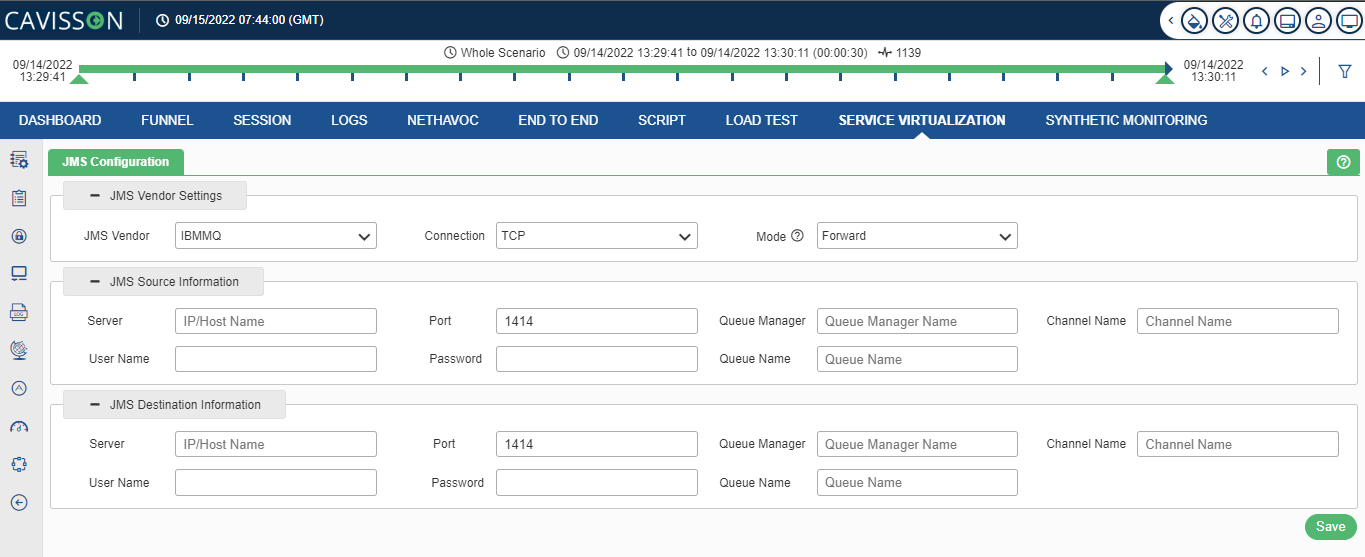
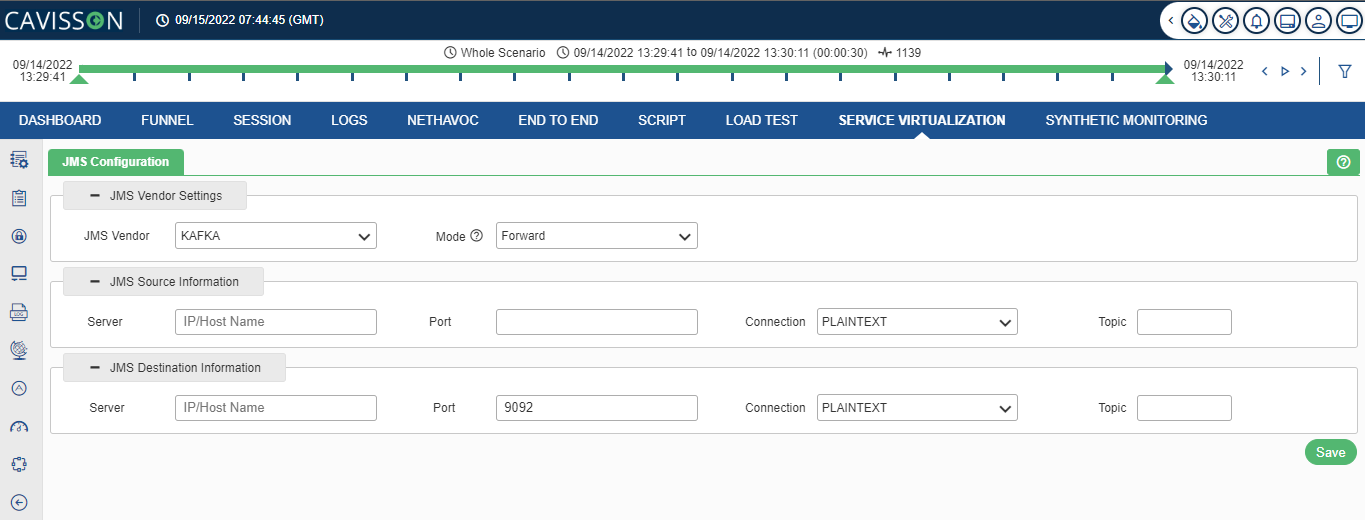
The user needs to provide the following inputs within JMS Configuration:
- Server IP / Host Name: It is the Kafka Server IP/Host name. It is a mandatory field.
- Port: It is the port where Kafka is listening. It is a mandatory field.
- Type/Messaging: (Topic/Queue) It is used as a message oriented middleware that is responsible to hold and deliver messages. It is a mandatory field.
- Consumer Group: It is a multi-threaded or multi-machine consumption from Kafka topics. It provides Kafka the flexibility to have the advantages of both message queuing and publish-subscribe models. A consumer group has a unique id. Each consumer group is a subscriber to one or more Kafka topics. It is a mandatory field on selecting ‘Consumer’ option.
- User ID/Password: It is the User ID and password for Kafka by which the they can have the monitoring access. It is an optional field, which depends on the server.
Connection Fault Settings
This feature enables user to do negative testing. This feature provides all the negative scenarios related to Connection fault. User can easily figure out the issues (if any) due to connection fault occur in the application. Click the Connection Fault Settings icon![]() to access the connection fault settings module as shown in figure below.
to access the connection fault settings module as shown in figure below.
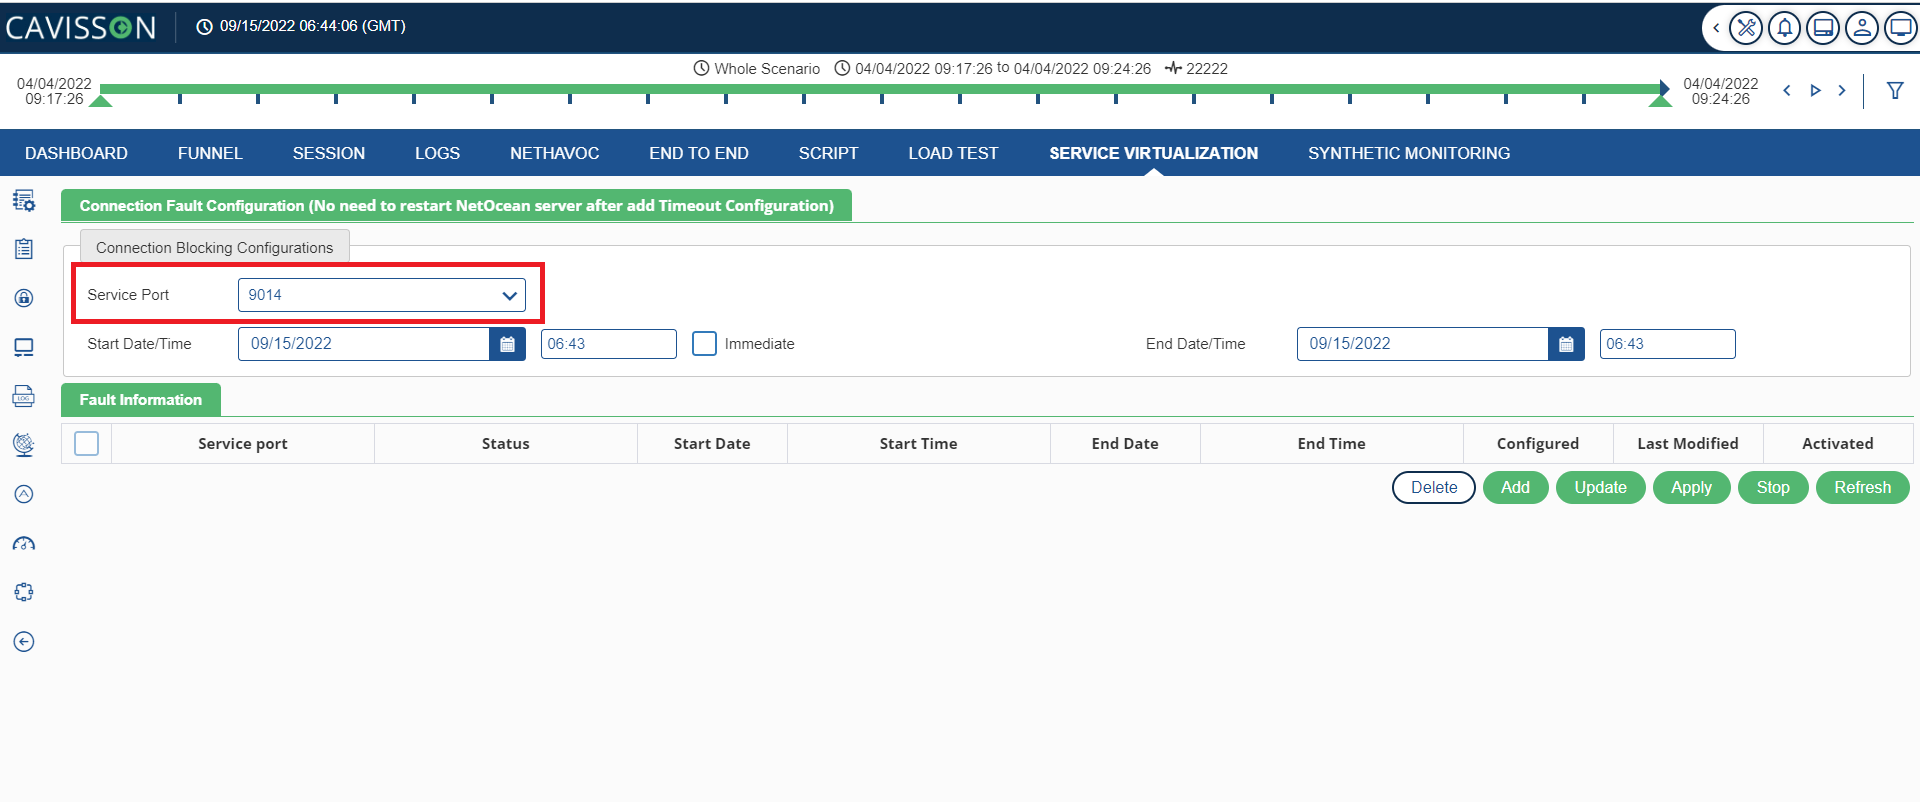
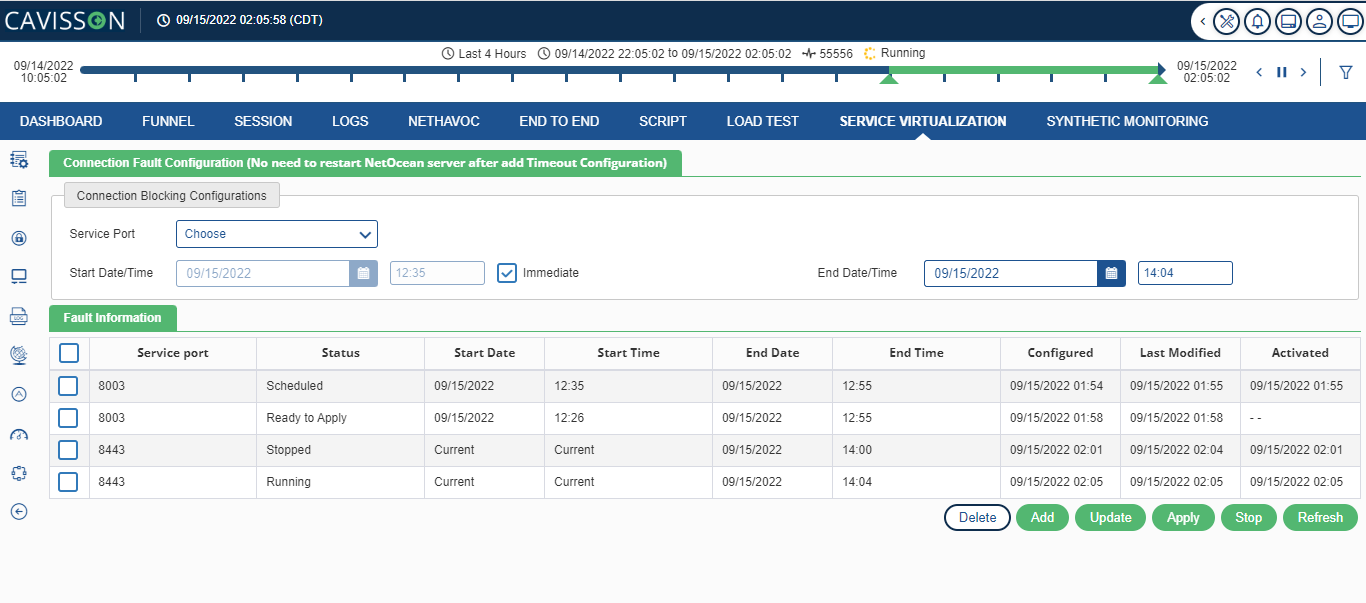
Note: If a connection time-out job is scheduled for the second time, the ‘used’ port is removed and only unused ports are displayed in the ports drop-down list.
Let us know check the details that are provided in the Fault Information table:
- Service Port: The service port that was used for timeout.
- Status: The status of the job. For example:
- Ready to Apply
- Applied
- Scheduled
- Running
- Completed
- Forced Stop
- Start Date: Start date of the job.
- Start Time: Start time of the job.
- End Date: End date of the job.
- Configured: The date and time when the specific port was configured for timeout.
- Last Modified: The timestamp at which any port configuration was updated/stopped, etc.
- Activated: The timestamp at which the port was put to ‘Applied’ state.
- User Actions
- Add: This is used to add a port to refuse the connection. To add a port, click on the
 Add button.
 - Update: Allow to update scheduled job only if the scheduled job is in “Ready to Apply” status. To update a scheduler, click on the Update
 button.
 - Delete: This deletes the scheduled job only if the scheduled job status is “Ready to Apply” or “Completed”. To delete a schedule job, click on the
 Delete button.
 - Stop: This stops the scheduled job only if the scheduled job status is “Scheduled” or “Running”. To stop the scheduler, click on the
 Stop
Stop - Apply: Apply the changes if the scheduled job status is “Ready to Apply”. To apply the changes, click on the
 Apply
Apply - Refresh: To refresh the connection fault settings, the user can click on the Refresh
 icon.
icon.
Note: Once the user has entered all the values and click on the Add ![]() button, the details will be displayed on the Fault Information window.
button, the details will be displayed on the Fault Information window.
- Refresh: Refresh the table to reflect recent changes.
Following is the template of on request callback method:
#include <stdio.h>
#include <time.h>
#include <stdlib.h>
#include <string.h>
#include “/var/www/Service Virtualization Server/include/Service Virtualization Server_log.h”
#include “/var/www/Service Virtualization Server/include/Service Virtualization Server_string_api.h”
#include <errno.h>
#include <unistd.h>
/*——————————————-
Name: MyService_after_request_callback
Purpose: This method is called on just before sending the response of the service.
Input: None
Return: None
————————————————*/
void MyService_after_request_callback()
{
}